It’s time to wrap up this series on Office 2016 deployment. We’ve built several prerequisite application packages, some Global Conditions, and the Office application package itself. Because Microsoft recommends not installing multiple versions of Office together and because Office Setup cannot remove all components of previous versions, we built a Configuration Manager package with all of the OffScrub scripts from Microsoft Product Support Services to allow reliable removal of previous versions.
The application package we built last time brought everything together except the Offscrub package. That application package is useful for an operating system deployment task sequence or to device collections where you know that no member device has a version of Office already installed. To have reliable installations of Office 2016 with no previous versions, we need to add one more component: a task sequence.
Building the Configuration Manager Task Sequence
Create a custom task sequence. Do not specify a boot image. Assuming that you are installing multiple Office programs, here is a suggested name and description:
| Name | Office Family 2016 (32-bit) [Remove existing] |
| Description | Removes previous versions of Office programs and then installs Office, Project, and Visio 2016 and all of their prerequisites. |
You will have to give some careful thought to the content of these fields; both of them have rather short length limitations that prevent more accurate descriptions than what is shown above.
Right-click the newly-created task sequence, and click Edit. Now I will describe each step you should add to the task sequence.
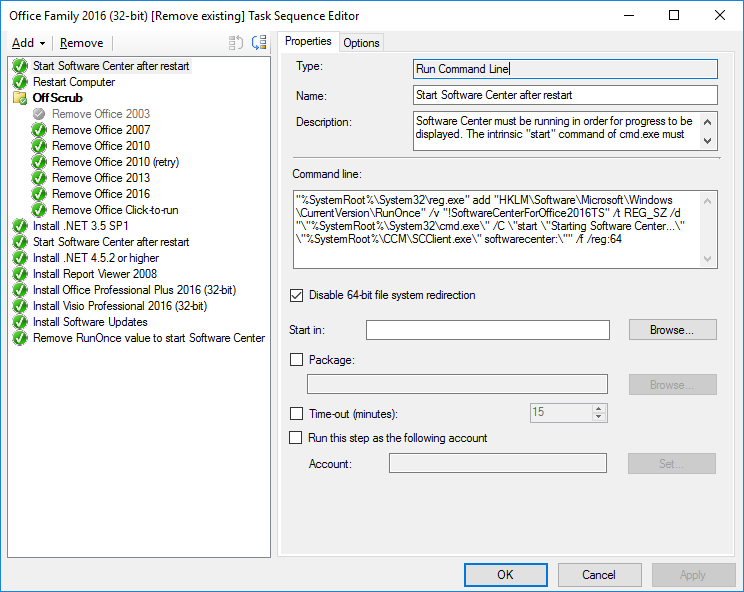
Step 1: Start Software Center after restart
| Type | Run Command Line |
| Name | Start Software Center after restart |
| Description | Software Center must be running in order for progress to be displayed. The intrinsic “start” command of cmd.exe must be used; otherwise, Software Center will start on sign-in, but the desktop will not be loaded until it is closed. |
| Command line | "%SystemRoot%\System32\reg.exe" add "HKLM\Software\Microsoft\Windows\CurrentVersion\RunOnce" /v "!SoftwareCenterForOffice2016TS" /t REG_SZ /d "\"%SystemRoot%\System32\cmd.exe\" /C \"start \"Starting Software Center...\" \"%SystemRoot%\CCM\SCClient.exe\" softwarecenter:\"" /f /reg:64 |
| Disable 64-bit file system redirection | Checked |
This step ensures that Software Center is restarted automatically the next time someone signs in. This is important to show status to the user in case the task sequence is being run. The exclamation point prefix on the RunOnce registry value defers deletion of the value until after the command has completed successfully. That means that the command will not be deleted if it fails, and it will therefore by tried again the next time the RunOnce key is evaluated.
Step 2: Restart the computer
| Type | Restart Computer |
| Name | Restart Computer |
| Description | The “/Force” switch is being passed to all of the OffScrub scripts. This kills running Office programs and will thus cause data loss of any unsaved files. Restart to prevent this from happening. |
| Specify what to run after restart | The currently installed default operating system |
| Notify the user before restarting | Checked |
| Notification message | Microsoft Office 2016 will be installed, and old versions of Office will be removed. The computer must restart to continue. Please save your work and close all programs. This upgrade process requires multiple restarts. You may sign into the computer after it restarts in order to view progress, but do not attempt use any programs until this process is complete. |
As the description says, the OffScrub scripts will all forcibly terminate any running Office application without prompting the user to save data. If a user runs this task sequence manually, this delayed restart step informs the user what is happening and gives him or her time to save data.
Step 3: Remove old versions of Office
| Type | Group |
| Name | OffScrub |
| Description | Remove old versions of Microsoft Office. |
We’ll call all of the OffScrub scripts from inside this group.
Step 3a: Remove Office 2003
| Type | Install Package |
| Name | Remove Office 2003 |
| Description | Runs OffScrub03 script from Microsoft Support. |
| Install a single software package | Selected |
| Package | Microsoft OffScrub |
| Program | OffScrub03 |
Step 3b: Remove Office 2007
Add a step to remove Office 2007 just like the one for Office 2003, replacing property values as appropriate.
Steps 3c and 3d: Remove Office 2010
Add a step to remove Office 2010 just like the one for Office 2003, replacing property values as appropriate. Then, make a copy of it so that there are two identical steps that remove Office 2010. Make the following changes:
- Change the description of the first one to:
Runs OffScrub10 script from Microsoft Support and continues on errors. OffScrub10 uses non-zero exit codes for informational reporting, which are interpreted by ConfigMgr to be errors. - Set the first one to Continue on error (on the Options tab).
- Change the name of the second one to:
Remove Office 2010 (retry). - Change the description of the second one to:
Runs OffScrub10 script from Microsoft Support again and fails on errors. OffScrub10 uses non-zero exit codes for informational reporting, which are interpreted by ConfigMgr to be errors. - Add a condition to the second one (on the Options tab):
Task Sequence Variable _SMSTSLastActionSucceeded equals “false”
Microsoft was consistent in the return values for all of the OffScrub scripts except for the one for Office 2010. In this one, some non-error conditions are reported back via the script’s exit code, and unfortunately there is no way to specify success values for ConfigMgr package programs. The approach I chose was to run the script once ignoring errors, and then run it again, if needed, failing on errors (thus causing the task sequence to stop).
If the first run of the script is successful and returns 0 (zero), the task sequence will record “true” in the _SMSTSLastActionSucceeded variable, and the second run of the script will be skipped due to the condition.
If the first run of the script is successful and returns a non-zero informational value, the task sequence will record “false” in the _SMSTSLastActionSucceeded variable, and the second run of the script will be executed, but it will have nothing to do and so will finish quickly, returning 0 (zero) because it has no special information to report.
If the first run of the script fails and returns a non-zero failure value, the task sequence will record “false” in the _SMSTSLastActionSucceeded variable, and the second run of the script will be executed. Assuming the script runs into the same problem that it did during the previous try, it will fail again, but this time the task sequence engine will see the failure and stop the task sequence.
Step 3e: Remove Office 2013
Add a step to remove Office 2013 just like the one for Office 2003, replacing property values as appropriate.
Step 3f: Remove Office 2016
Add a step to remove Office 2016 just like the one for Office 2003, replacing property values as appropriate.
Step 3g: Remove Office Click-to-run
Add a step to remove Office Click-to-run just like the one for Office 2003, replacing property values as appropriate.
Back outside of the OffScrub group, we’re ready to start installing software. The instructions below install all of the Office prerequisites as separate task sequence steps. This provides better feedback to the user as to what is happening and should make it easier to follow along in the logs if something goes awry.
New Install Application steps have a Retry this step if computer unexpectedly restarts checkbox checked and the number of times to retry set to 2 on the options tab. Leave these default settings for all Install Application steps added below.
Step 4: Install .NET 3.5 SP1
| Type | Install Application |
| Name | Install .NET 3.5 SP1 |
| Description | Leave blank. |
| Install the following applications | Add the .NET Framework 3.5 SP1 application package that we created earlier as the only item in the list. |
Step 5: Start Software Center after restart
Copy the Start Software Center after restart step from the top of the task sequence and paste it here.
In my testing, installing the .NET Framework 4.x required a restart for completion, so we’ll set up Software Center to start again after that installation and restart is complete. At the very end of the task sequence, we’ll delete this registry value if it is still present. This would be the case if the computer already had .NET 4.5.2 or higher installed prior to running this task sequence.
Step 6: Install .NET 4.5.2 or higher
| Type | Install Application |
| Name | Install .NET 4.5.2 or higher |
| Description | Leave blank. |
| Install the following applications | Add the .NET Framework 4.5.2 or higher application package that we created earlier as the only item in the list. |
Step 7: Install Report Viewer 2008
| Type | Install Application |
| Name | Install Report Viewer 2008 |
| Description | Microsoft Report Viewer 2008 is required for Database Compare 2016, which is a companion program to Access 2016. |
| Install the following applications | Add the Microsoft Report Viewer Redistributable 2008 (KB971119) application package that we created earlier as the only item in the list. |
Step 8: Install Office Professional Plus 2016 (32-bit)
| Type | Install Application |
| Name | Install .NET 3.5 SP1 |
| Description | Leave blank. |
| Install the following applications | Add the Microsoft Office Professional Plus 2016 (32-bit) application package that we created earlier as the only item in the list. |
Steps 9 and 10: Install Visio and Project
Add Install Application steps for the Visio and Project application packages that we created earlier. These will be much like the Office installation step above.
Step 11: Install Software Updates
| Type | Install Software Updates |
| Name | Install Software Updates |
| Description | Leave blank. |
| Install software updates assigned to the destination computer | All Software Updates |
Step 12: Remove RunOnce value to start Software Center
| Properties tab | |
| Type | Run Command Line |
| Name | Remove RunOnce value to start Software Center |
| Description | If the OS was fully patched (including having .NET 4.5.2 or higher installed) prior to running this task sequence, no restarts may have been triggered since the last “Start Software Center after restart” step, so remove the registry value if it is present. |
| Command line | "%SystemRoot%\System32\reg.exe" delete "HKLM\Software\Microsoft\Windows\CurrentVersion\RunOnce" /v "!SoftwareCenterForOffice2016TS" /f /reg:64 |
| Disable 64-bit file system redirection | Checked |
| Options tab | |
| Success codes | 0 1
That’s the number zero, followed by a space, followed by the number one. |
| Continue on error | Checked |
The description field contents pretty much explains what this is doing. Note the changes to the Options tab, though. If reg.exe deletes the value successfully, it returns 0 (zero). If the value is not there, though, it returns 1. Since we just want to run the command and consider it successful no matter what, we need to set 0 and 1 as valid success codes as shown above. As insurance that some other unknown error condition won’t cause the task sequence to register as a failure, we also check the Continue on error box.
Advice
That’s it! Running this task sequence will ensure that target machines have exactly one version of Microsoft Office—Office 2016—and that all of its prerequisites are present. You will want to think carefully about how you deploy it. If your users are conditioned to sign out at the end of each work day, you may be able to deploy the task sequence as required for a specific time overnight without many problems. If users typically leave their computers turned on and signed in, with unsaved data open in various applications, you may want to just deploy the task sequence as “Available”, and then notify users via e-mail that they can run the task sequence themselves from Software Center. Running it manually will give users the warning that the computer will be restarted and give them time to save their data.
Be advised that in my testing, this task sequence took a minimum of 30 minutes to run and typically took quite a bit longer; just installing the updates takes a while. If users will run the task sequence themselves, I suggest advising them to begin the task sequence before going to lunch or before leaving for the day. If you know that your environment doesn’t have certain versions of Office, you could disable the corresponding OffScrub step(s) in order to save time. For example, I don’t think there are any Office 2003 installations remaining in my organization, so I disabled that step. Further, we no longer have a site license for Project, so I removed it. With those changes, here is what my task sequence looks like this:
This is the best deployment for Office 2016 I have seen and documented.
We are running SCCM 2012 R2 and currently we are planning to upgrading about 6000 machines globally from 2003 to 2013
So far my testing has gone well without any issues.
Two questions I was wanted to ask
1. Start Software Centre after restart in Task Sequence. Why is this this required as I have not seen a use with Task Sequence Deployment Showing.
2. Also part of our deployment we wanted to include Language Packs to be installed with Office 2016 and using the XML file to including them in the install. This would also be good for other users if this was added to your deployment guide
Also third point regarding Windows Update. If we had a Software Update Package for Office 2016 in SCCM how can we add this setup in the task sequence instead of running the Windows Update
Thanks for the compliment, Menesh! I’m glad to hear things are going well for you and your project.
Responding to your questions:
Regarding Point 1 I have always had the progress bar after a restart on testing.
Regarding Point 2 We have ADR setup for the Office updates and get deployed 1 a month so I was trying to get the office updates applied after the install
Hello Mr. Michaud,
Thank you for this detailed explanation and walkthrough, it’s been very helpful. I setup this deployment in our SCCM 2012 R2 environment and tested the scrub scripts via a task sequence as you described. I tested this on a couple Windows 7 x64 bit OS’s that I randomly installed various versions of office on. In my test environment, it worked perfectly, and all version of office uninstalled properly.
However, upon first deployment out to a “real workstation” that’s been in the field for sometime, the process hung on the first scrub script, the 2003 uninstall. This system did NOT have 2003 Office installed on it, however the progress dialog stayed on “Uninstalling Office 2003” for over and hour without erroring out, or moving at all.
Is there any way I can determine what the script is hung up on? Is there any logging being done via the .vbs scripts? I know the setup in SCCM is correct as it runs properly in my test environment.
Any troubleshooting suggestions you can provide would be most helpful.
Thanks for reading, TedLarsen. Indeed, “real” machines are always weirder than test machines! If I recall correctly, all of the OffScrub scripts write logs to %TEMP%. If that is not helpful, you might want to try running the script interactively (without the /Quiet switch) from an administrative Command Prompt window. The output might help you deduce where the script is getting stuck. To fully replicate the task sequence environment, you would need to run 32-bit cmd.exe (located in %SystemRoot%\SysWOW64 on 64-bit Windows) as SYSTEM using Sysinternals psexec, and then run cscript.exe as a 64-bit process by using my CSCriptNative.cmd script described in the “Removing Old Versions” post.
As for debugging, I have read that Visual Studio can attach to VBS scripts for debugging, but I have never attempted this. In my case, I ended up omitting the OffScrub03.vbs script entirely because I was fairly certain that no one in my organization had Office 2003.
Hi,
Having trouble with the TS running CinfigMgr2012R2..looking to uninstall office 2013 off Win7 64 but machines ..All the apps and package runs fine in their own but not in TS..the PC displays the SW Center and restarts with description ..SC reopens on log in and get a “Restart Window” but PC doesn’t restart..next step us uninstall Office 2013 which begins then half way stops just saying failed and window will close in 15 mins …nothing in logs …if I set continue on error and goes to .Net framework app step again crashes …followed all steps as outlined .
Cheers
Hi akearins. Thanks for reading. It sounds like the task sequence is failing in multiple ways. If you are sure that you have checked the logs, it might help to divide the process into smaller pieces for troubleshooting. For example, if the OffScrub15 script (for Office 2013) works when run by itself from Software Center, you could try making a task sequence that *only* runs that script. If that fails, then there is something wrong with how the package program is working in the task sequence. If it succeeds, repeat the process with other components until you find the culprit. If they all succeed, start putting them together one at a time until you reproduce the failure. Of course, it will likely not be as easy as I just described, because ConfigMgr seems to bring out the worst in program interactions. If you are testing the process on existing production machines, try testing instead on a clean installation of the operating system and the application(s) you want to remove; maybe the real problem is some other piece of software that is interfering. I hope that helps!
Is there a way to have the task sequence first check if Office 365 is already installed, and if it is, don’t run the task sequence?
You could add a new group to the top of the task sequence and make every step a member. Then, on the Options tab for the new group, add two new conditions of type “Registry Setting”. You will want to test for the non-existence of the appropriate Programs and Features registry key(s) for the edition(s) of Office 365 in your organization. (That is, specify the registry keys and choose the condition “not exists” for each.) For example, for Office 365 Pro Plus, look for the following two keys to cover both 32-bit and 64-bit installations: “HKEY_LOCAL_MACHINE\SOFTWARE\Microsoft\Windows\CurrentVersion\Uninstall\O365ProPlusRetail – en-us” (32-bit Office on 32-bit Windows and 64-bit Office on 64-bit Windows) and “HKEY_LOCAL_MACHINE\SOFTWARE\WOW6432Node\Microsoft\Windows\CurrentVersion\Uninstall\O365ProPlusRetail – en-us” (32-bit Office on 64-bit Windows). With this configuration, the group’s members will only be executed if the specified registry keys do not exist, which is what you want.
Alternatively, you could create a device collection that excludes computers with Office 365 installed and then only deploy the task sequence to that collection.
Thanks for the great walkthrough!
Any idea why .NET 3.5 SP1 has to be installed when .NET 4.5.2 or higher is installed later in the task sequence?
Because the published system requirements say so! 😉
Some of the executables included in Microsoft Office target the .NET 2.0 runtime, which is included in the .NET Framework 3.5 SP1, and some of them target the .NET 4.x runtime. Therefore, both runtimes are required. I don’t know why Microsoft chose to do this.
Hi,
Thank you for you awesomeness guide. I tested this guide out and I had a 8/10 success on deploying. One thing I notice is that, what if in a enterprise environment, the main scope of the project was to only upgrade all Office Suite to 2016. Visio 2007, Project Professional and all those aren’t in the scope. From my perspective, I like the idea of upgrading to the latest version but from a manager’s point of view it could be a little bit different.
How would you change within the VBS script of 2007 and 2010 to only remove the STANDARD. Below is part of the script that will remove both Office 2007 Standard and 2010 Standard only from a 64-bit machine though. I would like to utilize the VBS script more because it’s more tactical and uses both 32-bit and 64-bit.
“%CommonProgramFiles(x86)%\microsoft shared\OFFICE12\Office Setup Controller\setup.exe” /uninstall STANDARD /config “\\Server\Shared\Installs\Microsoft\Uninstall\config.xml”
“%CommonProgramFiles(x86)%\microsoft shared\OFFICE14\Office Setup Controller\setup.exe” /uninstall STANDARD /config “\\Server\Shared\Installs\Microsoft\Uninstall\config.xml”